
In this comprehensive guide, we’ll explore everything you need to know about creating modern real estate headshots that convey confidence, approachability, and credibility.
The Importance of Professional Realtor Headshots
In today’s digital age, your headshot often serves as your initial introduction to potential clients. Whether they come across your profile on a real estate website, social media platform, or business card, your headshot is often the first impression they’ll have of you.
A professional, polished headshot can instantly convey trustworthiness and competence, while a poorly executed one can leave potential clients questioning your credibility.
1. Choosing the Right Photographer
When it comes to realtor headshots, investing in a professional photographer is non-negotiable. While smartphone cameras have come a long way, they simply can’t replicate the quality and expertise that a skilled photographer brings to the table.
Look for a photographer with experience in portrait photography, particularly in the real estate industry. They should have a portfolio that showcases their ability to capture flattering, professional headshots that align with your personal brand.
Pro Tip: If you feel a bit awkward in front of the camera, you’re a better candidate for professional over DIY photos. An experienced photographer can guide you to natural and inviting photos that will pay off in the long run.
2. Communicating Your Brand
Before your photo shoot, take some time to think about your personal brand and how you want to be perceived by potential clients.
Are you aiming for a polished and professional look, or do you want to convey a more approachable and friendly demeanor? Your clothing, grooming, and overall demeanor should reflect your brand identity.
For example, if you specialize in luxury properties, opt for upscale attire and grooming. If you cater to a younger, more casual clientele, a more relaxed look may be appropriate.
Pro Tip: Get a good night’s sleep the night before. It would be a shame to spend $250 on communicating to all prospects that you’re overworked.
3. Choosing the Right Location and Background
When selecting a location for your headshot session, choose a setting that reflects your brand and personality while remaining professional.
For many realtors, a clean, modern office setting provides the perfect backdrop for their headshots.
Alternatively, you may opt for an outdoor location that showcases your local area, such as a picturesque park or urban skyline. Avoid busy or cluttered backgrounds that may distract from your image.
Pro Tip: If you take headshots in your offices, avoid including company logos or anything else in the background that distracts from your face. The same goes for logos on clothing.
4. Posing and Expression
The key to a successful realtor headshot is a natural and approachable expression. Avoid forced smiles or overly serious expressions, as these can come across as insincere or unapproachable.
Instead, aim for a relaxed, genuine smile that conveys warmth and friendliness. Experiment with different poses and angles to find the most flattering options for your face shape and body type.
Your photographer should be able to provide guidance and feedback to help you achieve the perfect pose.
Pro Tip: Place your body at a 45º angle to the camera and head turned back towards the photographer.
5. Lighting and Composition
Proper lighting is essential for creating flattering realtor headshots. Natural light is often preferred for outdoor shoots, as it can help create a soft, flattering glow.
If shooting indoors, your photographer should use professional lighting equipment to ensure even, flattering light.
Pay attention to composition as well, making sure that the focus is squarely on your face and that there are no distracting elements in the frame.
Pro Tip: Try squinting your eyes very slightly while posing, which some photographers call a ‘squinch’. A mix between a squint and a pinch prevents the deer-the-headlights look.
6. Wardrobe Tips
Your wardrobe plays a crucial role in shaping the perception of your headshot. Choose clothing that reflects your personal style and brand identity, while also conveying professionalism and competence.
Solid colors tend to work best, as they won’t compete with your face for attention. Avoid busy patterns or logos that may distract from your image.
Additionally, make sure your clothing fits well and is neatly pressed to ensure a polished appearance. Consider using an AI clothes changer tool before or even after the photoshoot.
Pro Tip: Choose clothing and makeup that is more timeless than trendy to avoid making your headshots look outdated within a couple of years.
7. Hair and Makeup
For women, subtle, natural-looking makeup can help enhance your features and create a polished appearance.
Stick to neutral tones and avoid heavy makeup that may appear harsh in photographs. Men should pay attention to grooming as well, ensuring that their hair is neatly styled and facial hair is well-groomed.
Consider scheduling a professional hair and makeup appointment before your photo shoot to ensure you look your best.
In the same vein, men should get a haircut. But be sure to let your barber know that you’re getting a professional headshot. That way they don’t cut your hair extra short so it will “grow into” the perfect length.
Pro Tip: Avoid overdoing makeup! This is one of the most common mistakes. Believe me, less is more.
8. Retouching and Editing
While it’s important to present an authentic representation of yourself in your headshot, a bit of retouching can help polish your image and create a more polished appearance.
However, it’s crucial to strike the right balance – overly retouched photos can appear artificial and undermine your credibility.
Work with your photographer to identify any minor imperfections that can be subtly retouched, such as blemishes or stray hairs, while ensuring that your overall appearance remains natural and authentic.
Pro Tip: Avoid over-editing your realtor headshots if you choose a DIY route. This is very common mistake.
Updating Your Headshot Regularly
Finally, remember that your headshot is not a one-and-done affair. As your career evolves and your personal brand evolves, so too should your headshot.
Aim to update your headshot every few years, or whenever there are significant changes to your appearance or branding.
This ensures that your headshot remains an accurate reflection of who you are as a realtor and helps you stay relevant in an ever-changing industry.
Mistakes Agents Make With Headshots
Real estate agents, like professionals in any industry, can make several common mistakes when it comes to their headshots. Here are some of the biggest headshot mistakes real estate agents make:
1. Poor Image Quality
Using low-quality or poorly lit photos can immediately diminish the professionalism of your headshot. Blurry, pixelated, or poorly exposed images can create a negative impression and undermine your credibility as a real estate agent.
2. Lack of Professionalism
Your headshot should exude professionalism and competence. Wearing inappropriate attire, such as casual clothing or outfits that are too revealing, can detract from your professional image and make it difficult for clients to take you seriously.
3. Outdated Appearance
Using an outdated headshot can mislead potential clients and make it harder for them to connect with you. Make sure your headshot accurately reflects your current appearance, including hairstyle, grooming, and any changes in your personal style.
4. Overly Staged or Artificial Poses
While it’s important to look polished in your headshot, overly staged or unnatural poses can come across as insincere or inauthentic. Aim for a relaxed, approachable pose that conveys confidence and professionalism without looking overly posed or forced.
5. Inappropriate Backgrounds
The background of your headshot should be clean, uncluttered, and professional. Avoid distracting or busy backgrounds that can detract from your image and make it harder for viewers to focus on your face.
6. Ignoring Branding and Personal Style
Your headshot should align with your personal brand and the image you want to convey to potential clients. Ignoring branding and personal style can make your headshot feel generic and less memorable.
7. Over-Retouching
While some retouching can enhance your appearance and create a polished image, over-retouching can make your headshot look artificial and undermine your credibility. Aim for natural-looking retouching that enhances your features without altering your appearance.
8. Using Selfies or Unprofessional Photos
In today’s digital age, it’s easy to take a quick selfie and use it as your headshot. However, selfies often lack the quality and professionalism required for a real estate headshot. Invest in a professional photographer to ensure you get a high-quality, polished image that reflects your professionalism.
Avoiding these common headshot mistakes can help you present yourself in the best possible light and make a positive impression on potential clients in the competitive real estate industry.
Professional Headshots Costs and Services
The cost of professional headshots can vary depending on several factors, including the photographer’s experience and expertise, the location of the photo shoot, the number of images you require, and any additional services or products included in the package.
Generally speaking, expect to pay $75-$350 for a semi-experienced amateur and $250-$750 for an expert professional.
Here’s a breakdown of potential costs you should expect when investing in professional headshots.
Photographer’s Fee
The photographer’s fee is typically the largest component of the cost of professional headshots.
Fees can vary widely depending on the photographer’s skill level, reputation, and geographic location.
In metropolitan areas with a high cost of living, photographers may charge higher rates compared to smaller towns or rural areas.
Session Duration
Some photographers charge an hourly rate for their time, while others may offer packages that include a set number of hours for the photo shoot.
The session duration can vary depending on the complexity of the shoot and the number of outfit changes or locations included.
Number of Final Images
Most photographers will provide a set number of final images as part of their package.
This can range from a few select images to a larger gallery of photos to choose from. Additional images beyond the initial set may incur extra charges.
Retouching and Editing
Many photographers include basic retouching and editing services in their packages to enhance the final images. This may include adjustments to color, exposure, and minor blemish removal.
However, more extensive retouching or specialized editing may incur additional fees.
Prints and Digital Files
Some photographers may offer prints or digital files of the final images as part of their package, while others may charge extra for these additional products.
Make sure to clarify what is included in the package and inquire about any additional costs for prints or digital files.
Location Rental or Studio Fees
If you opt for a photo shoot in a studio or rented location, you may incur additional fees for the use of the space.
Studio fees can vary depending on the amenities and equipment available.
Travel Expenses
If the photo shoot requires the photographer to travel to a specific location, you may be responsible for covering their travel expenses, including transportation, accommodation, and meals.
Hair and Makeup Services
Some photographers offer optional hair and makeup services for an additional fee. This can be particularly beneficial if you want to ensure you look your best for the photo shoot.
Overall, the cost of professional headshots can range from a few hundred to several thousand dollars, depending on your specific requirements and the photographer you choose.
It’s essential to research photographers in your area, review their portfolios, and discuss your needs and budget upfront to ensure you find the right fit for your professional headshot needs.
How Should I Use My Headshot?
There are several places where you can post your real estate headshot to maximize its visibility and impact.
Google Business Profile: Check out our guide on How to Optimize Photos for your Google Business Profile. If you haven’t set up a profile yet, check out 11 Hacks for GBP Setup for Realtors.
Real Estate Websites: If you’re a realtor, your headshot should be prominently displayed on your profile page on real estate websites such as Zillow, Realtor.com, or your brokerage’s website. This is often the first place potential clients will look when researching agents in their area.
Social Media Profiles: Your headshot should also be featured on your professional social media profiles, including LinkedIn, Facebook, Instagram, and Twitter. These platforms provide an opportunity to showcase your personality and expertise to a wider audience.
Business Cards: Include your headshot on your business cards to make a memorable impression on clients and prospects. A professional-looking headshot can help reinforce your brand and make it easier for people to recognize and remember you. Consider adding to a digital business card.
Email Signature: Add your headshot to your email signature to personalize your communications and make a stronger connection with clients. This can help build trust and credibility by putting a face to your name.
Marketing Materials: Incorporate your headshot into various marketing materials, such as flyers, brochures, postcards, and newsletters. This helps create a cohesive brand image and reinforces your professionalism to potential clients.
Online Directories: Consider listing your headshot in online directories specific to the real estate industry, such as local MLS (Multiple Listing Service) directories or professional association websites. This can help increase your visibility within the industry and attract potential clients searching for agents in your area.
Personal Website or Blog: If you have a personal website or blog, prominently feature your headshot on the homepage or about page. This allows visitors to put a face to your name and learn more about you and your services.
By strategically posting your real estate headshot across various platforms and marketing materials, you can increase your visibility, establish credibility, and make a lasting impression on potential clients.
Using Photofeeler for Objective Feedback
Photofeeler is a valuable tool that can provide feedback on your real estate headshots from a diverse audience, helping you choose the most effective photo to use in your marketing materials.
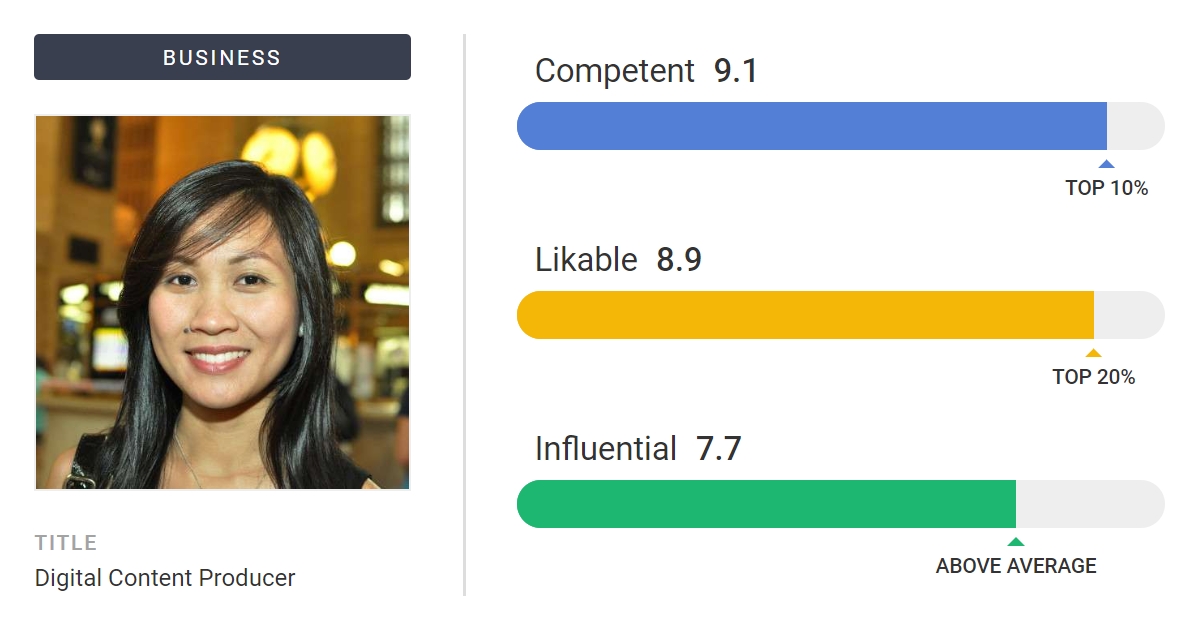
- Upload Your Headshot: Start by uploading your real estate headshot to the Photofeeler platform. You can choose from different categories such as “Business,” “Social,” or “Dating,” depending on the context in which you plan to use the photo.
- Select Criteria: Photofeeler allows you to specify the criteria you want raters to evaluate, such as competence, likability, and influence. For real estate headshots, you may want to focus on traits such as professionalism, approachability, and trustworthiness.
- Receive Feedback: Photofeeler will then gather feedback from a pool of anonymous raters who will assess your headshot based on the criteria you’ve selected. Raters will provide ratings and comments on various aspects of your photo, giving you valuable insights into how it is perceived by others.
- Analyze Results: Once you’ve collected enough ratings, Photofeeler will generate a report summarizing the feedback you’ve received. You can see how your headshot scored in each category and read comments from raters to understand their impressions.
- Iterate and Improve: Use the feedback from Photofeeler to make informed decisions about which headshot to use in your marketing materials. If certain aspects of your photo receive low ratings, consider making adjustments to your pose, expression, or background and retesting it on the platform.
By leveraging Photofeeler, you can gather objective feedback on your real estate headshots and make data-driven decisions to ensure you’re using the most effective photo to represent yourself to potential clients.
Best Tools and Tips for DIY Realtor Headshots
Creating DIY realtor headshots can be a cost-effective solution, especially if you’re on a tight budget or need updated photos quickly. Here are some tools and tips to help you capture professional-looking DIY realtor headshots.
Pro Tip: Consider hiring a high school or university student with some photography experience as a low-budget compromise to professional headshots.
- Camera or Smartphone: While a professional camera will yield the best results, modern smartphones often have high-quality cameras that can produce excellent images. Use a smartphone with a high-resolution camera and manual settings for greater control over exposure and focus.
- Tripod: Invest in a sturdy tripod to stabilize your camera or smartphone and ensure sharp, clear images. A tripod allows you to position the camera at the perfect angle and height for flattering headshots.
- Natural Light: Whenever possible, utilize natural light for your DIY headshots. Choose a location with ample natural light, such as near a large window or outdoors in a shaded area. Avoid harsh sunlight, as it can create unflattering shadows and highlights on your face.
- Background: Select a clean, uncluttered background for your DIY headshots. A plain wall or neutral backdrop works well, as it won’t distract from your image. Alternatively, consider shooting outdoors against a natural backdrop, such as greenery or an architectural feature.
- Clothing and Grooming: Dress in professional attire that reflects your personal brand and the image you want to convey to clients. Avoid busy patterns or logos that can detract from your image. Pay attention to grooming as well, ensuring your hair is neatly styled, and your face is clean and well-groomed.
- Posing and Expression: Practice different poses and expressions in front of the camera to find what works best for you. Aim for a relaxed, confident demeanor with a natural smile. Experiment with angles and tilting your head slightly to find the most flattering pose.
- Self-Timer or Remote Shutter: Use the self-timer function on your camera or smartphone, or invest in a remote shutter release to trigger the shutter remotely. This allows you to step away from the camera and focus on posing without rushing to press the shutter button.
- Editing Software: After capturing your DIY headshots, use editing software to enhance and refine the images. Basic editing tools like brightness, contrast, and color adjustments can help improve the overall appearance of your headshots. There are many free and paid editing software options available, such as Adobe Lightroom, GIMP, or Snapseed.
- Feedback from Others: Once you’ve captured your DIY headshots, solicit feedback from friends, family, or colleagues. They can provide valuable insights and suggestions for improvement before finalizing your headshots.
By utilizing these tools and tips, you can capture professional-looking DIY realtor headshots that effectively represent your brand and convey professionalism to potential clients.
FAQs About Realtor Headshots
1. How important are realtor headshots in the real estate industry?
Realtor headshots are incredibly important in the real estate industry as they serve as your first impression to potential clients. A professional and polished headshot can convey trustworthiness and competence, helping you stand out in a competitive market.
2. Should I hire a professional photographer for my realtor headshots?
Yes, investing in a professional photographer is highly recommended for your realtor headshots. While smartphone cameras have improved, they can’t match the quality and expertise of a skilled photographer. Look for someone with experience in portrait photography, particularly in the real estate industry.
3. How should I prepare for my realtor headshot session?
Before your session, take some time to think about your personal brand and how you want to be perceived by clients. Choose clothing and grooming that reflect your brand identity, and consider the location and background for your photoshoot. Practice different poses and expressions to find what works best for you.
4. What should I wear for my realtor headshot?
Solid colors tend to work best for realtor headshots, as they won’t compete with your face for attention. Choose clothing that reflects your personal style and brand identity, while also conveying professionalism and competence. Avoid busy patterns or logos that may distract from your image.
5. How often should I update my realtor headshot?
It’s a good idea to update your realtor headshot every few years, or whenever there are significant changes to your appearance or branding. This ensures that your headshot remains an accurate reflection of who you are as a realtor and helps you stay relevant in an ever-changing industry.
6. Is retouching and editing necessary for realtor headshots?
While a bit of retouching can help polish your image, it’s important to strike the right balance. Overly retouched photos can appear artificial and undermine your credibility. Work with your photographer to identify any minor imperfections that can be subtly retouched while ensuring your overall appearance remains natural and authentic.
Schedule a Meeting
Let’s chat about how an SEO-focused website that YOU OWN, Google Business Profile Campaigns, or Custom Email Campaigns can generate high-quality leads and exceptional long-term ROI. If my services aren’t the best move for you, I’ll gladly point you in the right direction