Step-by-Step Setup for Realtor Facebook Business Page
Setting up a Facebook page for your real estate business is an excellent way to increase your online presence, engage with potential clients, and showcase your listings.
Follow this step-by-step guide to create an effective and professional Facebook page, with helpful examples to guide you.
Step 1: Create a Facebook Business Account
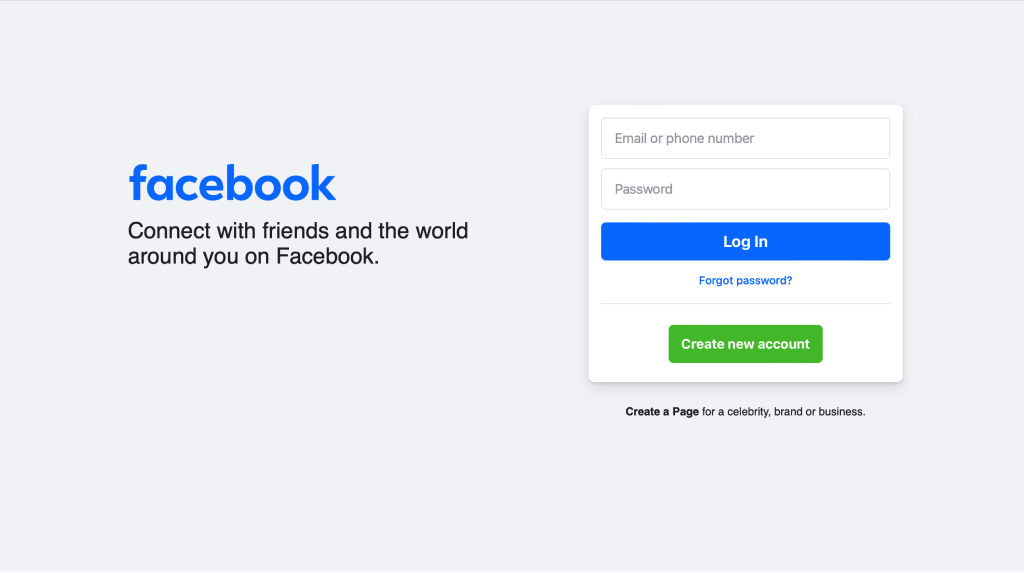
- Log In or Sign Up: If you don’t have a Facebook account, sign up at facebook.com. If you already have an account, log in.
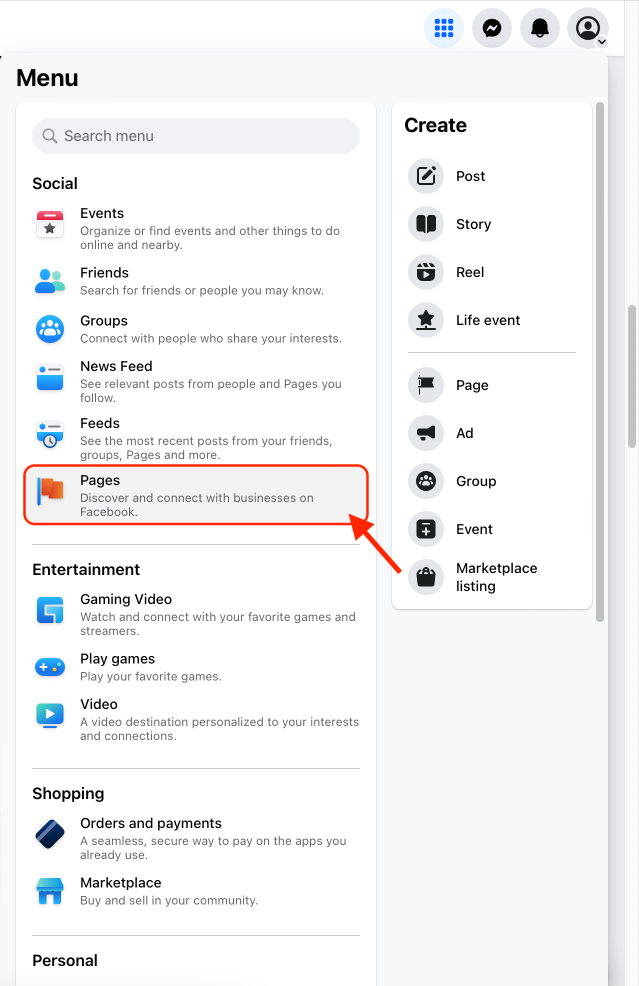
- Access Business Pages: Go to the Facebook homepage and click on the nine dots icon (menu) in the top-right corner, then select “Pages”.
Step 2: Create a New Page
- Create a Page: Click on the “Create New Page” button.
- Enter Page Information
- Page Name: Use a name that reflects your business and is easy to remember, such as “Jane Smith, San Francisco Realtor”
- Category: Type in “Real Estate Agent” or “Real Estate Service”.
- Description: Provide a brief, engaging description of your services. For example, “Helping you find your dream home in [Your City] with personalized service and expert advice.”
Pro Tip: The hacks from How to Create the Perfect Google Business Title for Agents apply to your Facebook Business name. Find the perfect SEO-friendly name for you.
Example Realtor Facebook Page Info
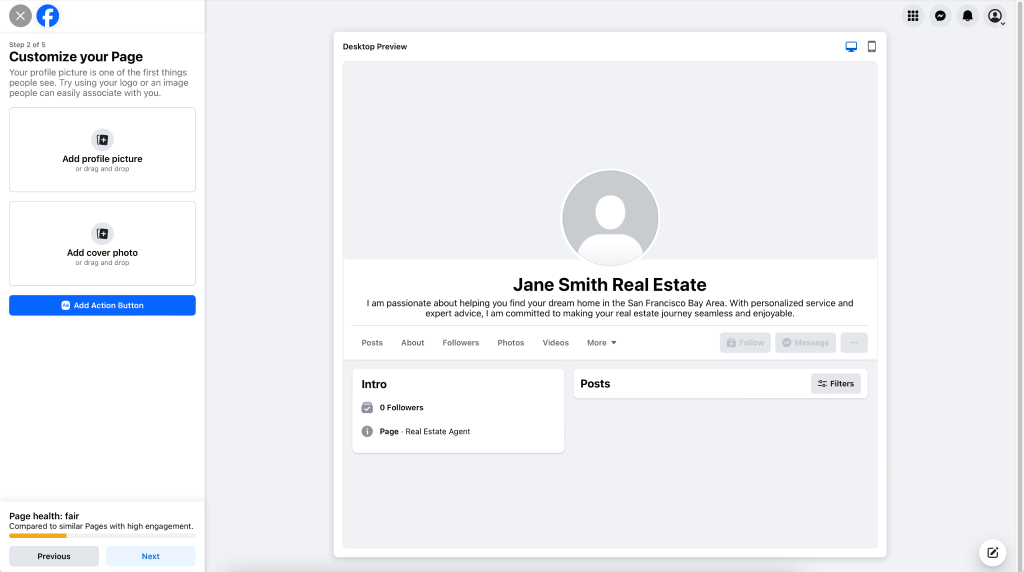
- Page Name: “Jane Smith Real Estate”
- Category: Real Estate Agent
- Description: “I am passionate about helping you find your dream home in the San Francisco Bay Area. With personalized service and expert advice, I am committed to making your real estate journey seamless and enjoyable.”
Step 3: Complete Your Page Information
- Contact Information: Add your phone number, email address, and website URL.
- Location: If you have a physical office, add your address.
- Hours of Operation: Specify your business hours.
- About Section: Write a detailed, mission-based story about your business, highlighting your experience, specializations, and any awards or recognitions.
Pro Tip: The tips from How to Write Real Estate Bios That Convert 50% More Leads apply to your Facebook Business About section.
Step 4: Add Profile and Cover Photos
- Profile Picture: Use a professional photo of yourself or your business logo. The recommended size is 170×170 pixels.
- Cover Photo: Choose a high-quality image that represents your business, such as a photo of a featured property or your team. The recommended size is 820×312 pixels.
Pro Tip: Check out 45 Tips for the Perfect Realtor Headshots (Professional and DIY).
Pro Tip: Use Canva AI to create a great banner photo.
Example About Section
“Hi, I’m Jane Smith, and my journey in real estate began over 10 years ago. In my twenties, it occurred to me that somewhere in the world was the realtor who helped my parents find my super beloved childhood home, complete with a backyard treehouse.
Since then, I have always been fascinated by the idea of helping people find a place they could call home. This passion led me to pursue a career in real estate, where I specialize in residential and commercial properties in the San Francisco Bay Area.
I take pride in providing personalized service and expert advice, ensuring my clients feel confident and supported throughout their home buying journey.
In 2023, I was honored to receive the ‘Top Realtor’ award by the Bay Area Real Estate Organization. Whether you’re buying, selling, or just exploring your options, I’m here to guide you every step of the way. Let’s find your nest home together!”
Pro Tip: Increase conversions and outreach by creating an agent bio video according to Real Estate Agent Bio Videos: Strategies, Tips, and Scripts.
Step 5: Customize Your Page Settings
- Messaging: Enable messaging so clients can contact you directly through Facebook. Set up automated responses to greet users or provide basic information.
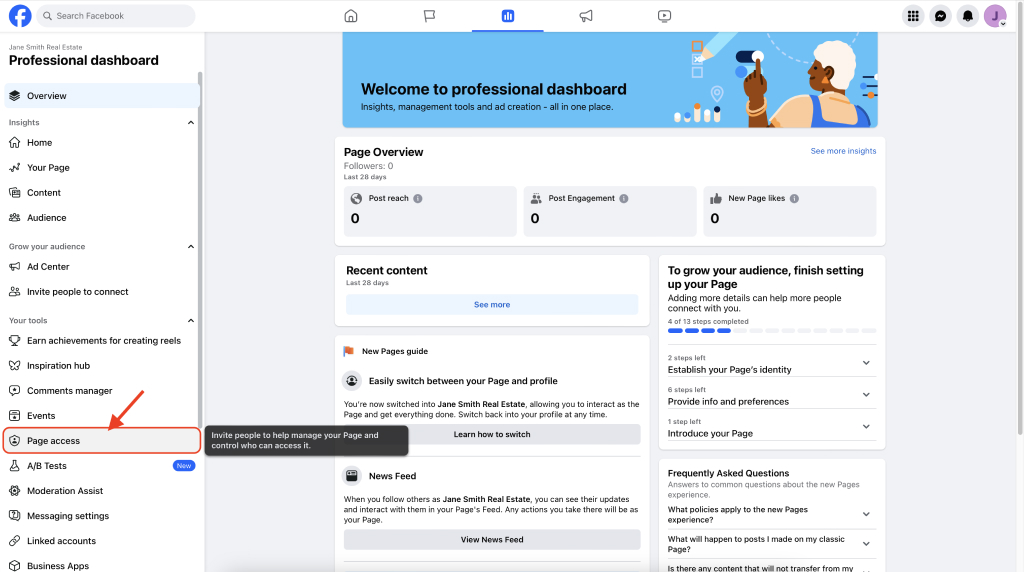
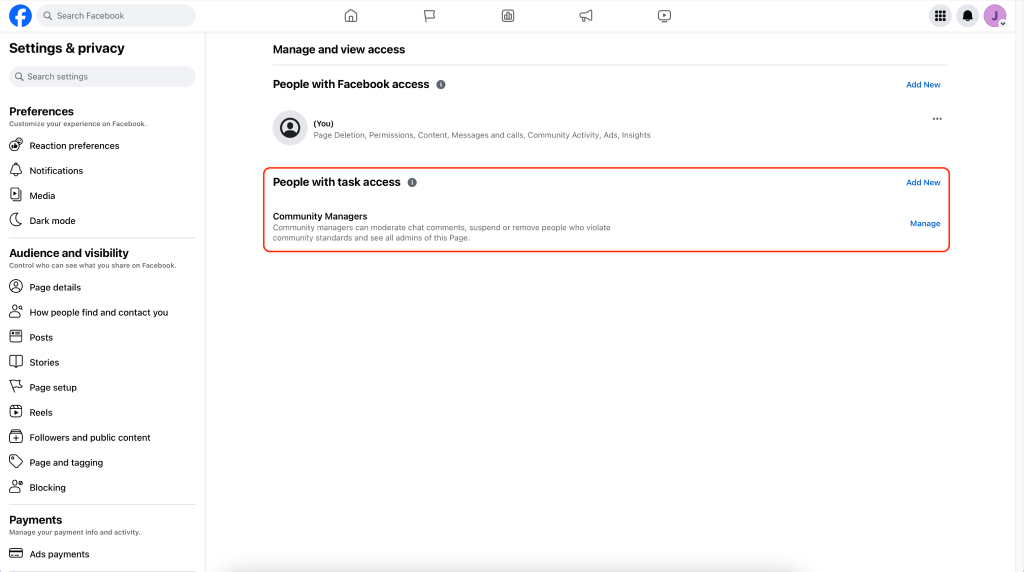
- Page Roles: If you have a team, assign roles to manage the page. Go to your Page. Click “Manage” below Page’s cover photo, then click “Page access” to add administrators, editors, or moderators.
Step 6: Create and Share Content
- Listings and Open Houses: Regularly post photos and details of new listings, open houses, and virtual tours.
- Market Updates: Share updates on the real estate market, including trends, tips, and relevant news.
- Client Testimonials: Post testimonials from satisfied clients to build credibility and trust.
- Engagement Posts: Share engaging content such as home improvement tips, neighborhood highlights, and real estate FAQs to interact with your audience.
Pro Tip: Find more hacks for amazing, high-conversion client testimonials on 3 Powerful Google Review Hacks for Realtors to Rank #1.
Example Real Estate Facebook Content
- Listings: “New listing! Beautiful 4-bedroom home in the heart of San Francisco. Join us for an open house this Sunday!”
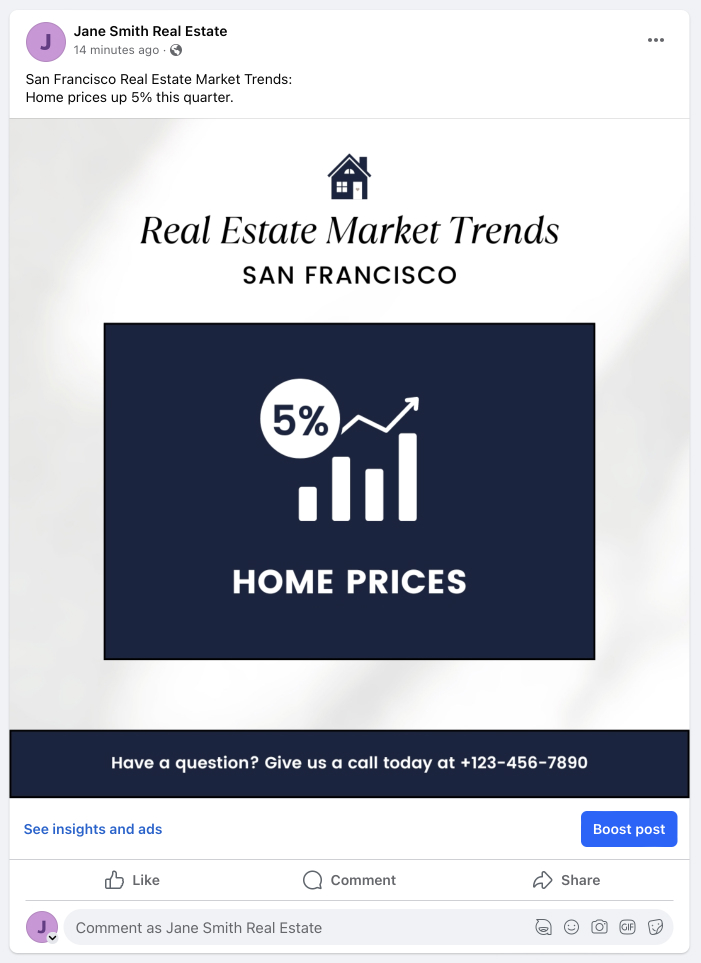
- Market Update: “San Francisco real estate market trends: Home prices up 5% this quarter.”
- Testimonial: “Jane helped us find our dream home in no time! Highly recommend her services.”
- Engagement Post: “Top 5 home improvement tips to increase your property’s value.”
Pro Tip: Check out 150 Viral Social Media Content Ideas for Real Estate Agents for more inspiration.
Step 7: Promote Your Page
- Invite Friends and Clients: Use the “Invite Friends” feature to ask your Facebook friends to like your page. Send invitations to your email contacts and past clients.
- Join Local Groups: Participate in local community groups related to real estate and engage with members by sharing your expertise. Examples of groups to join might include:
- “Homes for Sale in San Francisco”
- “San Francisco Real Estate Network”
- “Neighborhood Watch San Francisco”
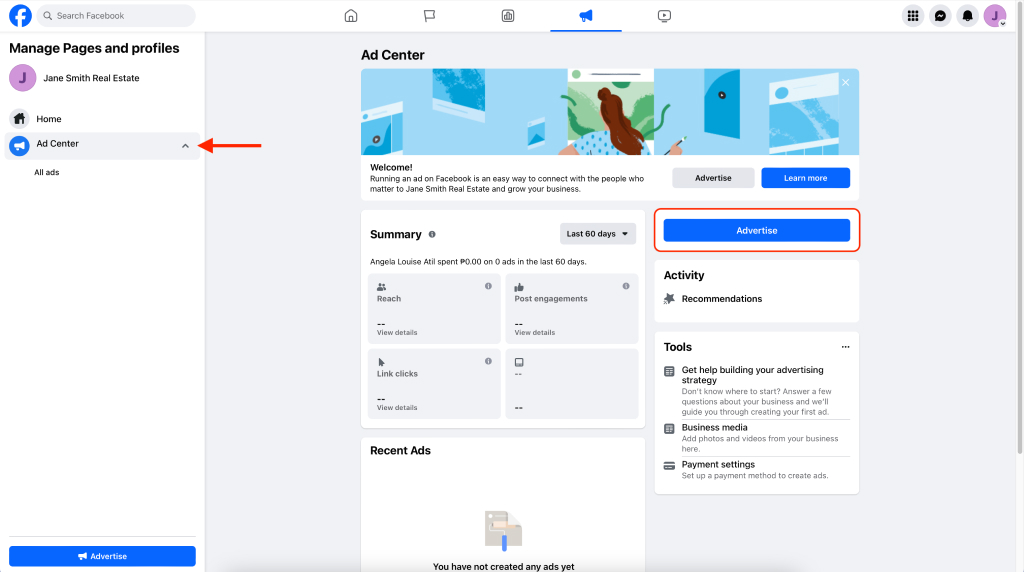
3. Facebook Ads: I don’t recommend it, but consider using Facebook Ads to reach a larger audience. Target your ads based on location, demographics, and interests to attract potential clients.
Step 8: Monitor and Optimize
- Insights: Use Facebook Insights to monitor your page’s performance. Track metrics such as page likes, post reach, and engagement to understand what content resonates with your audience.
- Feedback: Encourage clients to leave reviews and provide feedback on your services. Respond to comments and messages promptly to maintain good customer relations.
- Continuous Improvement: Regularly update your page with fresh content and adjust your strategy based on performance data to continually improve your page’s effectiveness.
How to Optimize a Facebook Business Page as a Realtor to Get Leads
Optimizing your Facebook business page is crucial for realtors who want to attract and convert leads. By implementing advanced strategies, you can enhance your page’s visibility, engagement, and effectiveness in generating leads. Here’s how you can take your Facebook page to the next level.
Leverage Advanced SEO Techniques
Keywords and Tags
- Keyword Integration: Ensure that your most important keywords (e.g., “real estate in [Your City]”) are naturally included in your posts, updates, and descriptions to improve searchability.
Pro Tip: Check out 350 Real Estate SEO Keywords to Generate the Best Leads for more inspiration.
- Hashtags: Use relevant hashtags in your posts to increase discoverability. Examples include #RealEstate, #HomesForSale, #[YourCity]RealEstate.
Pro Tip: Check out 121 Real Estate Hashtags and How To Use Them Best for more inspiration.
Custom URL
- Vanity URL: Create a custom URL for your page (e.g., facebook.com/JohnDoeRealEstate). This makes it easier for clients to find and remember your page.
Create High-Quality, Interactive Content
Interactive Posts
- Polls and Questions: Engage your audience with polls, surveys, and questions. Ask for their opinions on market trends, home buying tips, or neighborhood preferences.
- 360-Degree Photos and Videos: Use 360-degree photos and videos to give potential buyers a virtual tour of your properties.
User-Generated Content
- Client Stories: Encourage your clients to share their home buying or selling stories on your page. User-generated content adds authenticity and builds community.
- Photo Contests: Run photo contests where clients can share pictures of their new homes or favorite neighborhood spots.
Free eBooks for Agents
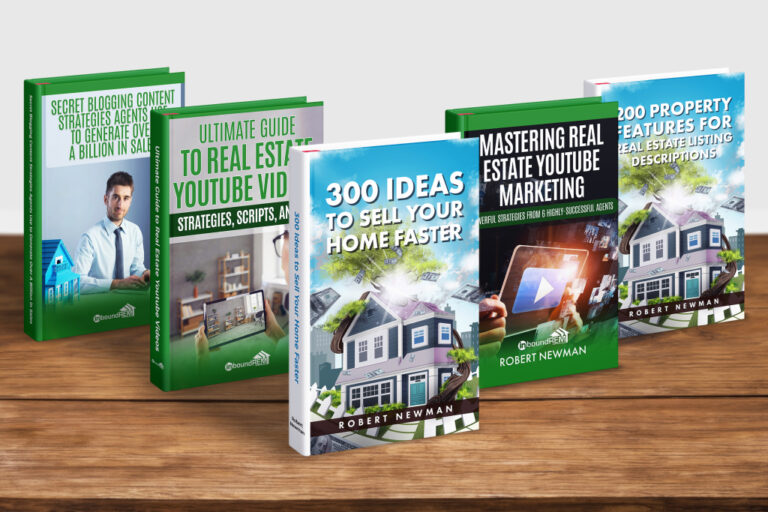
Download any or all of our real estate marketing eBooks. These books contain cutting edge information, deep-diving case studies, actionable hacks to skyrocket your business.
Engage with Light Real Estate Content
Engaging your audience with light real estate content is a powerful way to maintain a steady presence on Facebook without always focusing on hard-selling.
This type of content keeps your audience entertained and informed, fostering a stronger connection with your brand. Here are some resources for incorporating light real estate content into your Facebook strategy.
- 50 Hilarious Real Estate Jokes, One-Liners, Puns & Roasts
- 175 Funny, Relatable, and Spicy Real Estate Memes
- 50 Inspiring and Funny Real Estate Quotes for Agents
- 15 Binge-Worthy Real Estate Shows to Stream in 2024
- 50 Fun Real Estate Facts to Blow Your Hair Back
- 20 Best Real Estate Movies (Plus Ratings & Trailers)
Utilize Facebook Business Tools
Facebook Shops
- Property Listings: Set up a Facebook Shop to list properties directly on your page. This allows users to browse listings without leaving Facebook.
Facebook Events
- Open Houses and Webinars: Create Facebook events for open houses, webinars, and other real estate-related events. Promote these events to reach a wider audience.
- Event Reminders: Use the event feature to send reminders to attendees, ensuring higher attendance and engagement.
Call-to-Action Button
- CTA Button: Add a call-to-action button to your page, such as “Contact Us,” “Sign Up,” or “Book Now,” to encourage direct engagement. This makes it easy for potential clients to take the next step, whether that’s contacting you, signing up for a newsletter, or booking a consultation.
Steps to Add a CTA Button
- Navigate to Your Page: Go to your Facebook business page.
- Locate the CTA Button Area: Below your cover photo, you’ll see an option that says “Add a Button” if you haven’t set one up yet. If you already have a CTA button, it will show the existing action (e.g., “Contact Us”).
- Click “Add a Button”: Click on this option to start setting up your CTA button.
- Choose Your Action: Facebook provides several options for your CTA button. For real estate, the most relevant actions might be:
- Contact Us: Direct users to your contact page or contact form.
- Sign Up: Encourage users to sign up for your newsletter or an upcoming event.
- Book Now: Allow clients to schedule appointments or consultations.
- Send Message: Direct users to send you a message via Facebook Messenger.
- Enter the Required Information: Depending on the action you choose, Facebook will prompt you to enter additional information. For example, if you choose “Contact Us,” you’ll need to provide a URL to your contact page.
- Finish and Save: After entering the necessary details, click “Save” to add the CTA button to your page.
Tips for Optimizing Your CTA Button
- Be Clear and Direct: Use clear and direct language that tells users exactly what they can expect when they click the button.
- Align with Your Goals: Choose a CTA that aligns with your current marketing goals. If you want to increase consultations, “Book Now” might be the best choice.
- Track Performance: Monitor the performance of your CTA button through Facebook Insights to see how often it’s being clicked and adjust if necessary.
- Promote the CTA: Regularly remind your audience about the CTA in your posts. For example, if your CTA is “Sign Up,” mention the benefits of signing up for your newsletter in your content.
By strategically using the CTA feature, you can effectively guide your Facebook visitors toward meaningful actions that help generate leads and grow your real estate business.
Invest in Advanced Advertising Strategies
Lookalike Audiences
- Targeting: Use Lookalike Audiences to target users who are similar to your current clients. This can help you reach potential leads who are more likely to be interested in your services.
- Custom Audiences: Create Custom Audiences based on your website visitors, email list, or engagement with your Facebook page.
Dynamic Ads
- Personalized Ads: Use Dynamic Ads to automatically show personalized property listings to users based on their interests and behavior on your website.
Should I Boost Facebook Posts?
Generally, boosting posts is not the most effective use of your advertising budget. While it can increase the reach of individual posts, it lacks the targeting precision and flexibility of Facebook Ads.
Instead, invest in targeted ad campaigns that align with your marketing goals and leverage Facebook’s advanced targeting options.
Enhance Engagement with Automation
Chatbots
- 24/7 Availability: Implement a chatbot on your Facebook page to answer common questions, provide property information, and schedule appointments, even when you’re not available.
- Lead Qualification: Use chatbots to pre-qualify leads by asking key questions and gathering contact information.
Automated Posting
- Content Scheduling: Use tools like Hootsuite to schedule your posts in advance. This ensures a consistent posting schedule and frees up your time for other tasks.
Build and Nurture Your Community
Facebook Groups
Facebook groups are essential for generating free leads due to their targeted and highly engaged audiences.
Unlike regular Facebook posts, which have a median engagement rate of only 0.07%, groups offer a much higher level of interaction.
Approximately 1.8 billion people engage with Facebook groups monthly. Focus on joining local groups related to specific cities, neighborhoods, or niche interests like pets, parenting, or local business owners.
These groups already contain targeted audiences that can become valuable leads for your real estate business.
- Create Groups: Start a Facebook Group related to your local real estate market. Use this group to share exclusive content, answer questions, and build relationships with potential clients.
- Engage with Members: Regularly interact with group members by posting updates, sharing market insights, and responding to their posts and comments.
Community Involvement
- Local Sponsorships: Sponsor local events, charities, or sports teams and promote these sponsorships on your Facebook page. This demonstrates your commitment to the community and increases local visibility.-13
- Local Content: Share content related to community events, local businesses, and neighborhood highlights to show your deep knowledge and involvement in the area.
Monitor and Analyze Performance
Advanced Analytics
- Page Insights: Dive deeper into Facebook Insights to analyze metrics such as audience demographics, peak engagement times, and post performance.
- Google Analytics: Integrate your Facebook page with Google Analytics to track traffic and conversions from Facebook to your website.
Continuous Improvement
- Feedback Loop: Regularly ask for feedback from your audience about the type of content they find most valuable. Use this feedback to refine your content strategy.
- Experimentation: Continuously test different types of content, posting times, and advertising strategies to see what works best for your audience. Use A/B testing to make data-driven decisions.
Showcase Your Real Estate Listings on Facebook
Facebook provides an amazing platform for maximizing the visibility of your listings.
Go beyond simply sharing your listings on your profile and get creative with Facebook’s immersive features.
Here are some effective ways to showcase your real estate listings on Facebook.
List Properties on Facebook Marketplace
Facebook Marketplace is a discovery and search experience on Facebook designed to help millions of people find their next home.
This feature enables you to list your inventory at no cost, providing an easy and affordable way to get your property listings in front of interested browsers.
How to List Properties on Facebook Marketplace:
- Access Marketplace: Go to the Facebook homepage and click on the Marketplace icon in the left-hand menu.
- Create a New Listing: Click on “Create New Listing” and select “Home for Sale/Rent.”
- Enter Property Details: Fill in all relevant information about the property, including photos, price, location, and a detailed description.
- Publish the Listing: Review the listing for accuracy and click “Publish.”
Host a Virtual Open House
Open Houses are an essential part of the homebuying process. However, with more buyers shopping and deciding on homes online, it’s becoming harder to get interested buyers into the home.
Facebook LIVE offers realtors the opportunity to virtually showcase listings through a real-time, interactive broadcast directly from your smartphone.
How to Host a Virtual Open House on Facebook Live:
- Schedule Your Live Event: Use Facebook Live Producer to schedule your live video up to one week in advance. This helps to drum up interest and allows you to promote the event.
- Promote the Event: Share the event on your page, groups, and create an event listing to reach a wider audience.
- Prepare for the Broadcast: Plan the tour, making sure to highlight key features of the property. Ensure you have good lighting and a stable internet connection.
- Go Live: On the day of the event, go live from your Page, Group, or Open House Event. Interact with viewers by answering questions in real-time and providing additional details about the property.
- Save and Share the Video: After the live session, save the video and share it on your page and other relevant groups to reach those who couldn’t attend live.
Use Facebook Stories to Highlight Listings
Facebook Stories are another engaging way to showcase your real estate listings. They appear at the top of the Facebook feed and can be a great tool for capturing attention quickly.
How to Use Facebook Stories for Listings:
- Create Engaging Content: Use high-quality images and short videos to create stories. Highlight the best features of the property and include a call-to-action.
- Add Interactive Elements: Utilize polls, questions, and stickers to make your stories interactive and engage with your audience.
- Link to Listings: If you have over 10,000 followers, use the swipe-up feature to link directly to your listings or virtual tours.
By leveraging these Facebook features, you can maximize the visibility of your real estate listings, engage with potential buyers in innovative ways, and ultimately drive more leads for your business.
Schedule a Meeting
Let’s chat about how an SEO-focused website that YOU OWN, Google Business Profile Campaigns, or Custom Email Campaigns can generate high-quality leads and exceptional long-term ROI. If my services aren’t the best move for you, I’ll gladly point you in the right direction

